WIP. High Poly Reventon.
Printable View
Update this.
something I did when I was bored, it's just a rough draft so far.
I drew a squirtle.
Don't ask.
http://i.imgur.com/YgJJJ.jpg
I'm... horrified.
He got his rape face on.
The one in the tutorial had that same face so i kinda had to roll with it.
Also I went with a more realistic bent to everything than the tutorial did. I don't think I've ever seen a real life turtle without its rape face on.
What the fuck...
Sorry about camera movement. Just needed a quick panning animation.Quote:
Originally Posted by myself on youtube
Thought I might drop this in here...I am not a photographer or anything just did this the other day :P
http://www.vivid-abstractions.net/wp...tography/1.jpg
Oh that Reventon is sexi, looks great so far cant wait to see it finished
Patrick that looks exactly like a picture I took when I was in New York.
Well, almost. lol
drawin' some retrofuturistic skeletonsamurairobots
http://i.imgur.com/TKRmw.jpg
With my new baby
http://i.imgur.com/Wkurc.jpg
Why hello there. Again. I thought I'd go ahead and re-introduce myself while I had the chance. As you can see, it's been a bit over two years since I was here last, but I've still been following the CE mods a bit. I saw the death of Metroid Online, the death of CMT, and the rise of smaller projects, but I never got into the forums much. I just wasn't much of an internet user back then. But two years later, I've made my home on the intarwebs, and I figured I'd come back here now that I'm less of a wee little nooblet. So hello again. I'll probably stick around this time.
Anyway, back OT, dunno if you get much pixel art here, but I've been working on this on and off recently. And I have no idea how to texture those damn clouds. I've finished 3-4 other projects while putting off those clouds.
http://img695.imageshack.us/img695/8347/le4u.png
Those are some pretty fantastic mountains. I'm not really a pixel artist, so I'm not really sure how to texture the clouds. More shades with slightly different contours might do the trick, as well as some slight color variation between them and the mountains. They look like they're both about the same hue. See what whitening them up a bit does, but keep that color cast from the sky.
Also, progress
http://i.imgur.com/RA1q8.jpg
I would make the spinal column look more robotic than organic. At least, as it currently is, it looks like it's a spinal column and not a cyborg-like spinal column (what I mean by cyborg-like is that it doesn't look like a mix between organic and robotic).
Eh, I like it the way it is. I'm putting skeletal analogues on the guy already, might as well put them in places where the effect makes an impact. They're supposed to look like brushed metal, though, so i guess i should fix that.
I like it!
his legs are kinda thin :V
They're just a gesture for now, I haven't drawn them proper yet.
:P
Ha ha. Hahahaha. Hahahahahahahahahaha! Doesn't have to look mechanical:Quote:
Originally Posted by DarkHalo003
The fuck is that?
I didn't make it, was a response to the quote demonstrating that you can use organic shapes to do mechanical just as well. It's a 3D render of a Safeguard Exterminator unit from Tsutomu Nihei's best work, BLAME!.
http://img571.imageshack.us/img571/3...569e200e54.jpgQuote:
Originally Posted by Warsaw
:D
Done (OR IS IT?)
http://i.imgur.com/rinft.jpg
@Warsaw: Touche.
@Exam: Looks cool. Interesting designs on the legs though. At first I thought they looked a little wirey, but I saw how you did the joint-like connectors and realized that it qualifies the design of the legs.
I love the character but I hate the legs and arms simply because I cannot see how they work. Obviously it does not need to be explained how they work, but it is just the inner OCD yelling at me.
http://i623.photobucket.com/albums/t...packrender.jpg
made in a 2.5 hour modelling session.
recorded the whole thing here, if interested.
suggestions etc are welcome for future reference, because i'm not going to change this thing, since it's just for texturing practice :P
edit: it's a jetpack.
You mean modeling practice?
Also, turned out great man. :)
no, i mean texture preactice, this thing was no challenge for me at all, modelling wise.
Oh you are going to texture this too? Cool!
I'd love to see your process in texturing it. :)
that's the idea yeah.
hurrr.
wanted to relax my head a bit during a marathon texturing session, so i made this in 15 mins :v:
200 tris :P
http://i623.photobucket.com/albums/t...f/froggggg.jpg
ive attached the file lol.
Doin some more high poly modeling practice. Eventually I'll bake the whole thing out and texture it
http://i.imgur.com/4aV6B.jpg
http://i.imgur.com/wQY8E.jpg
looking good, nice edges, the only comment i have is that the handle seems to connect to the body part rather painfully, and the fat edge at where the magazine goes in could use some tightening up (as well as that part right above it in the 2nd picture)
I'll see what I can do about those other parts but in terms of the pistol grip do you mean where the actual frame meets the lower receiver (lower body for non gun nuts) or where the roundness of the grip ends and squares off? If it's the latter I can go back and soften that edge up a bit so it's a little more of a smoother transition. Thanks for the comments.
Concept art
http://image.odinseye.org/images/environmen.jpg
seems rather bland.
that thing is BEGGING for some ambient occlusion and a dirt-pass
Forgot to add my comments from my site:
I havent done ao yet because the model isnt done. No sense it button clicking a new UV channel until the model is done.Quote:
~60% done. needs AO and Optimization. Slightly over Budget
can easily do like a 1 minute render in Max to get a good AO pass over the model for the purpose of presentation. Actually just showed someone how to do that for that exact same concept
some more progress, haven't really addressed the issues neuro pointed out just yet
http://i.imgur.com/26vpF.jpg
Front sight assembly is slightly too wide, too, when I compare it to the one I have sitting here.
yeah I'd have to agree
Pen, have a look at this guys :P
http://www.polycount.com/forum/showthread.php?t=88790
Pretty much same attention to detail, he didn't use floaters though. It's wonderfully time saving to use floating geo but sometimes can make your AO a bitch in the long run if you don't do it well. some areas of his I like better than mine. Once you get down to this level of detail, it kind of becomes just another m4 model >_> just like everyone before me.
Yeah, pretty much all there is to differentiate your model vs. someone else's is how well you distribute a limited number of polygons. Remove the limit and you're just copying real life, not much to say about it except how accurate it is compared to the real thing, or how well it's rendered.
it doesnt help that apparently everyone and their mum needs to have made an M4 model nowadays, so alltogether they lose their level of impressive, no matter how well it's built.
(and then usually awful texturing ruins it)
Basically. Only thing that really makes a difference is the texture, how well you bake down the high poly, and the kind of attachments you use. But this and the AK are probably the two most over modeled guns. I simply undertook the task because I happen to own an AR-15 and it made it super easy to model having it in my lap. It was probably about 24 hours total of modeling time on the high poly, if that. Plus being one of my more favorable rifles it was fun to make.
I feel like this has reached a stage of decency:
Attachment 2361
Attachment 2362
Basic criticism? I'm mainly trying to get the shape now. The grip is turbosmoothed because I really didn't know where else to go with it. The hammer is obviously not done and I have modeled the trigger yet (both take a minute, so they aren't priorities, but that's why part of the frame isn't filled in yet. The Chamber is easily WIP (duh) and I'm positive it'll be a swing-out, but if I make the chamber area bigger then I may make it a fixed cylinder just for simplicity. Besides the grip, chamber, and obvious areas, there is no smoothing, so please refrain from pointing out so. And yeah, my render sucks, I'm working on it.
I used the Ranger Sequoia in Fallout New Vegas as the primary reference:
http://fallout.wikia.com/wiki/Ranger_Sequoia
As far as porportions go it's a bit simplistic but not bad I suppose.. needs textures.
Sculpting a character in Sculptris, planning on getting it into some engine at some point. Improvising for the most part. Inspiration from various sources. I'm sure my anatomy's a bit off.
http://img703.imageshack.us/img703/1...nsterthing.png
http://img16.imageshack.us/img16/7256/monsterthing2.png
http://img706.imageshack.us/img706/2...sterthing3.png
Hmm... the two main weapons from Counter-Strike.Quote:
Originally Posted by PenGuin1362
Coincidence? I think not.
Attachment 2365
Attachment 2366
Modeled the hammer and the area surrounding the chamber. Nothing is detailed (for the most part) and i'm still wondering what to do with the grip.
@Mookz: When I plan to get a good computer program for texturing, I plan to make my own, unwrap, and animate it. I'm positive it'll go into CE.
dark, Photoshop. all the way.
I plan on it. It's 80% off for me since I'm a student, so when I have enough money then I'll buy it alongside a tablet. Considering I'll probably animate before texturing, I wouldn't expect that sort of thing any time soon.Quote:
Originally Posted by neuro
Does anyone else here have a minor aneurism while trying to model the Halo Wars Cobra? Lack of proper references = :raise:
what's with kids BUYING their tools nowadays?
http://www.halowars.com/images/unsc_...ra_concept.jpgQuote:
Originally Posted by DarkHalo003
http://haloism.files.wordpress.com/2009/03/11_cobra.jpg
http://halowarsguide.com/wp-content/...02-550x300.jpg
and there are others. When I modeled mine before it became corrupt that long time ago, I only used 1 or 2 refs I believe.
I've been trying to use those, but I wish I had a complete aerial view (as in I can see everything from a Top view rather than a slant). I too had/have a file that has made some okay progress, but the polygons are doubled over and it's messy. I'll probably take another day off and then begin redoing the model. Sometimes you just have to let things process. Oh and not having an Xbox 360 to view a Cobra in real time makes this difficult.Quote:
Originally Posted by Nero
learn to build from a single perspective shot.
slowly making progress. Not used to working with mechanical/metal parts, so the armor's going to take a while. Hoping to have a Mike Jenson kind of look behind it by the end.
http://img339.imageshack.us/img339/7951/updatething.png
you know jensen actually made a gnomon workshop dvd of his workflow.
might be worth checking out for you
Oh. Sweet, I'm going to have to look into it. I've always loved the guy's stuff. Real inspiring.
http://i.imgur.com/40sCu.png
I don't even know
hay that's pretty kewl lol
Attachment 2383
Attachment 2384
Attachment 2385
How does this look for integrating a structure into cliffs?
Not bad, but is it going to be an entrance or just a fancy wall?
If it were going to be an entrance, I'd recommend lights on struts as I've indicated below.
Attachment 2389
Also, the left portion of the wall, underneath the awning by the cliff, looks a bit off. You might need to adjust the position of a vertex or two to make the wall look strait.
Yeah the structure itself isn't too detailed primarily for the point of just seeing if it looks alright the way it's integrated into the cliffs. I'll work on details later; I just want to get down some fundamental integration of different geometry types first.Quote:
Originally Posted by DarkHalcyon
Essentially geomerging. Not a bad way to go, but check out some references to make sure it looks they way you want it to look. Even Halo's campaign maps like b30, b40, and even c10 have some good geomerged structures.
Off the top of my head there are the two massive structures on b30, some of the thresholds to the indoor/outdoor environments in b40, and the two massive openings from and to the swamp in c10. Check those out and see how everything is meshed together. Look at how the natural conforms to the artificial.
What you've got going here isn't bad, just make sure you think it looks absolutely perfect in your mind's eye.
:making up words:
I'll just drop these two here. I decided to dick around in ToonBoom and Flash a little in class last week and this week.
Working on a new shield world model. Completely lacking detail around the North and South poles but I hope to get those looking spiffy in the near future.
As you can see, it's just a simple shield world with a different design. I am going to add a lot more detail, especially around the larger structures such as the North and South poles and anything going along the equator. Oh, and that terrain texture is just a place-holder. Tell me what you think so far.
think of what, there's nothing to say anything about in the images.
i guess it's a neat idea if you pull it off properly, but i've got my doubts really.
I made a model.
http://i.imgur.com/2JzXr.png
Don't be discouraged from no posts... its just how this place roles. lol.
I take it that its a high poly? Pretty neat man. Whats it part of?
Thanks!Quote:
Originally Posted by Nero
One of my college classes right now is basically an introduction to 3dsmax course. The second to last assignment is this sort of screw-widget thing that we have to create from a reference image that only shows two similar perspectives. The reason it looks so high poly is because we have to use either a mesh smooth or turbosmooth modifier on everything(absolutely despise those tools) before we present them. I can't begin to tell you how many times I've had to use the cut tool on that thing.
I'm somehow on top of that class right now. I honestly have no idea how I'm as ahead as I am in there.
Make sure the college teach you properly, from my experience of UK Schools that teach 3ds max they teach it wrong. Very wrong :/Quote:
Originally Posted by MXC
protip:
if you want to learn this shit, ask someone who knows.
protip: not a teacher.
Tweaked it a little more. Still can't stand Turbosmooth.
http://i.imgur.com/Rqjni.jpg
don't like it?
don't use it ^_^
tbh, it's for more advances users only really, if they're 'teaching' you to use it in an indroductory class, they're total fuckwits.
it takes a good understanding of how it works, proper geometry and modelling workflow to be able to predict the outcome of it properly.
Use sub-division, and try to have your mesh one flush piece rather than sticking that axle through the solid as a different piece. It's an excellent way to learn techniques by merging them together as apposed to keeping them separate.
Yeah so it's my first time attempting a head. What am I doing right/wrong?
Attachment 2469
Attachment 2470
Attachment 2471
And a 360 degree rotation:
http://www.youtube.com/watch?v=QXYz6lNbrJI
I know the back of the neck/head is pretty flat, but there's something else bothering me about this face. I know something's wrong, I just can't figure it out.
Things I personally would change (All imo ofc)
-Nose is to flat (make it more "longer"?)
-Upper cheek bones are coming out to much making his face look wide
Again, i haven't studied human face yet, and haven't modeled one... so I am not one to really say. I suggest looking at a lot of refs of heads and try to sketch out the bone structure of the head. Study that, and then you will know which parts are off because you have an understanding of the structure of the human face.
Maybe someone else can be of more help. :)
First attempt at a head, had to model my own for Uni assignment. It turned out alright which surprised me. Still some things to fix and tweek, look un-needed loops.
http://i58.photobucket.com/albums/g2...all/face_8.jpg
Why is the model so dense?
It seems like there is a lot of wasted poly's all around, apart of the hair.
Well it was only like 2.5K triangles, and we have a limit of 6K. I was going to mesh smooth it but it took it up to 8K, cant get it lower, so I just tessallated it. need to remove some loops though and fix things. Got the limit, might as well use it. Gotta be tomorrow, just done this today, quick job.
I don't understand why you tessellated it... was it for the fun of it? Or did it somehow effect the look of your model? Also, if you post an un-tessellated model, someone could probably point out what areas you can save polies and what you can fix.
Is this supposed to be really stylized? Or are you trying to go for realism?
Back of the neck and is way too flat and needs to be more rounded. There's not enough detail to really crit at this point... topology looks decent enough, from my inexperienced eye. Use references, as always.Quote:
Originally Posted by UnevenElefant5
http://anatomytools.com/
http://www.posemaniacs.com/
And I personally wouldn't go with straight-up lowpoly modeling for characters, given the engines and graphical capabilities out there these days. You're probably going to want to sculpt a character first then retopo it then bake normals later in another program. I suggest Sculptris or Zbrush.
http://www.pixologic.com/sculptris/
Here's a tutorial of how to retopo in Blender.. I'm sure similar methods could be used in Max.
http://vimeo.com/14560538
I would prefer to use MeshSmooth or TurboSmooth, but they could not be used. It was half the triangle count that I had available, adding more triangles means smoothing lighting,so why not. This is for a simple assignment and wont be going ingame. Supose I could undo the tessellation, it has got to be submitted tomorrow though so no point.
End result will be photorealistic, it has got to go through ZBrush ect still and be re-topped.
Edit:
@t3h m00kz
Thanks, but like I said it's for a Uni assignment, that what we have got to do is model it in max like so, I know these days it would be sculpted :P And I will sort the neck out.
Those cheek indents under the eyes (midway through the face) really don't exsist.
Think of drawing a face. You don't put harsh outlines through the drawing, instead you use shading to pronounce shapes. Same thing with modeling, try creating a nice smooth face with out any harsh abrupt areas. Unless you someone who really looks like that in real life, I think that needs re-work.
Good luck with the assignment man!
@Nero
THAT'S what it is. The cheekbones are all off. Thanks for pointing that out, I knew something was off, I just couldn't put my finger on it. The nose is still one of the areas that I need to work on. I basically just dragged out some verts as a placeholder.
@Mookz
Well I was following a tutorial and the guy started out with a low poly and then just applied a turbosmooth modifier to add detail within the existing mesh. Is this a good idea? It seemed like one to me, but I don't know much about this subject so yeah.
Thanks for all the resources. I'll be sure to check them out.
The video tutorial is nothing more than retopologization/optimization of a high poly to low poly model, and should not be your starting point.
The process of actually creating a sculpt should be your first step which can be done in a program such as Zbrush or Sculptris, and yes, in Blender as well. Though I highly suggest screwing around with Sculptris and trying to make things before following the retopo tutorial, Sculptris automatically adds in geometry as you sculpt, and there is no need for tools like turbosmooth.
If you pick up Sculptris... learn the hotkeys! I cannot stress this enough. There's not may of them.
Once you have created a sculpt, then you can start worrying about retopo.
UE - Topology looks decent for a first attempt. The form is pretty much uniformly wrong, though. Use good reference material. Model with the mouth closed. You will need more topological density around key areas, like the eyes, the bottom of the nose, and the corners of the mouth to help preserve those areas against the smoothing operation. Also, clean up the topology around where the ears would be running down the neck. Unnecessary edge loops there.
Hunter - Dear God, do not tessellate an organic form like that. You're just going to make it lumpy and hard to work with later on. Don't triangulate it, either. The assigned polygon limit is plenty for what you're trying to do. You should only be smoothing the whole model near the beginning of the project to get a basic head shape from a crude block head model. After that, edge loops should be placed and tweaked almost exclusively by hand.
Rule of thumb - only affect creases in your model if they are a part of the silhouette. Nose and ears qualify, laugh lines do not. You may, however, steer your topology so that you have an edge loop that is coincident with the laugh line, but that's all. At that detail level you should not be trying to accentuate it with topological density. Leave it for the texture or the sculpt.
That isn't all that's wrong there, but it's a start.
Alright thanks, also it isnt triangulated, just the render
Another project from school. I'm actually having a ball with this program(ToonBoom), but I can't get myself to animate on 2s instead of ones.
Sorry for the lousy audio quality, it's the best I had to work with.
I figured I'd give the whole "shield world" thing another go. This time, it certainly turned out better than before.
I think the central structures look perfect. A bit wider than my reference pic, but I couldn't do a thing better. I just need to texture all the fancy metal pieces and rework the ground and I should be finished. Feel free to point out any other areas I could improve upon later.
I'm confused on what I'm looking at. I don't get what a world shield thing is.
It's a Dyson sphere. The miniature sun is in the centre of the construct, and the habitable space surrounds it.
I feel like those pylons in the middle need to be of a shape that better portrays their size. I'm not sure how to describe it. Those pylons are, make no mistake, massive.
HUNDREDS AND HUNDREDS OF KILOMETERS MASSIVE
Never understood the appeal of Dyson spheres, how do they deal with the radiation and solar wind? Or gravity for that matter, if you rotate you're only providing acceleration along a single axis, you'll get pulled into the star if you start moving away from it.
As for distance the only way that's obvious is fog, dof, lighting, etc, which isn't really modeling is it?
anyway made this in 10 minutes when I got bored.
http://i.imgur.com/7P8GY.gif
super duper foldiness
http://i.imgur.com/bVp2T.jpg
I don't use fancy materials when animating sorry if you can't stand the look of plain colors.
I like it. The return to origin seems to stop a bit abruptly, but aside from that it's pretty solid and unique.
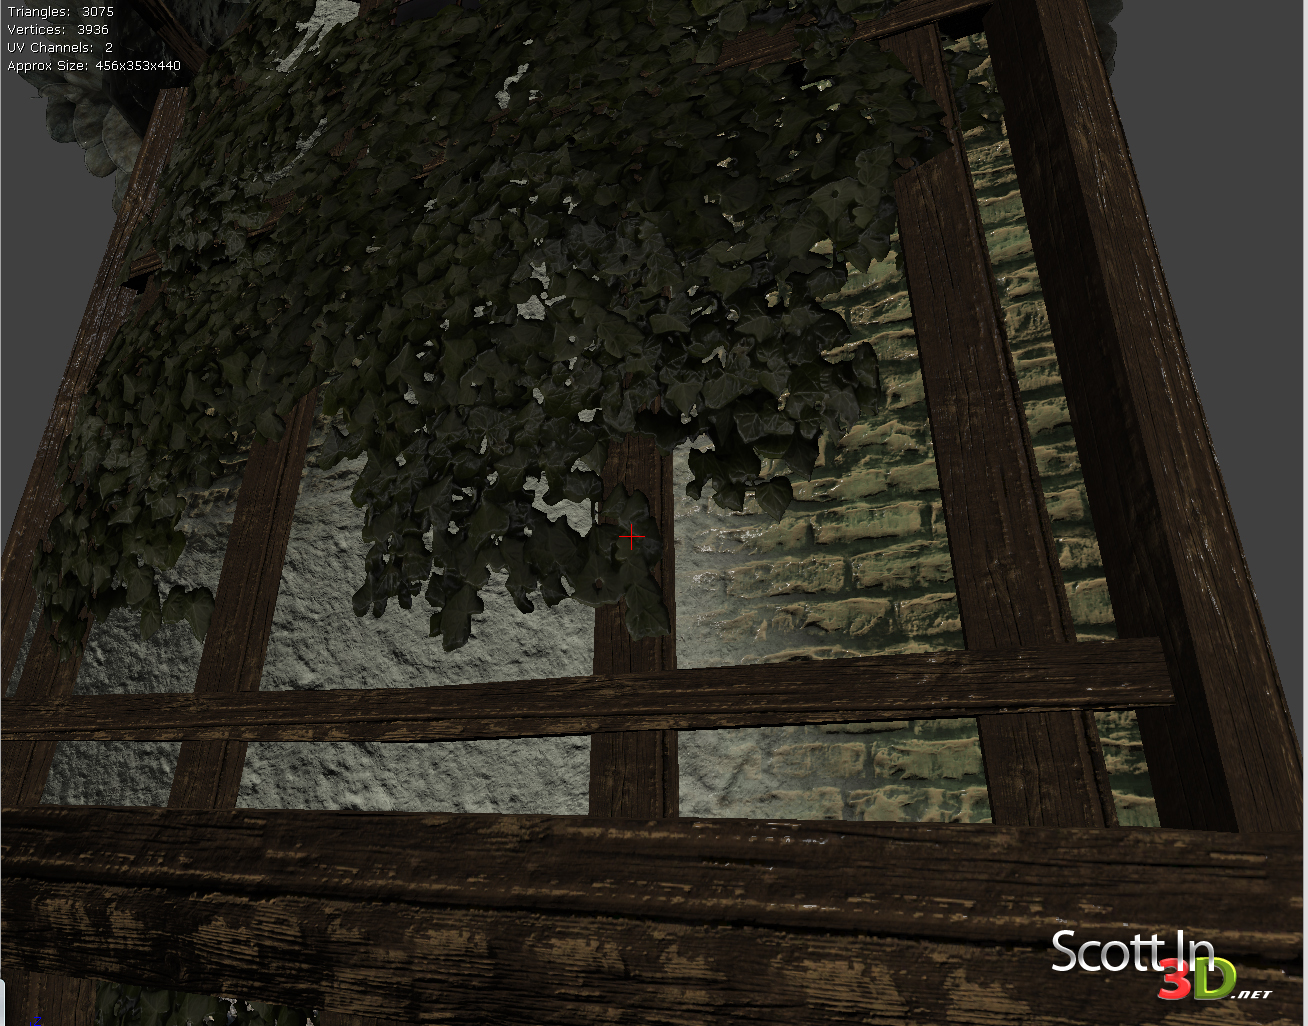
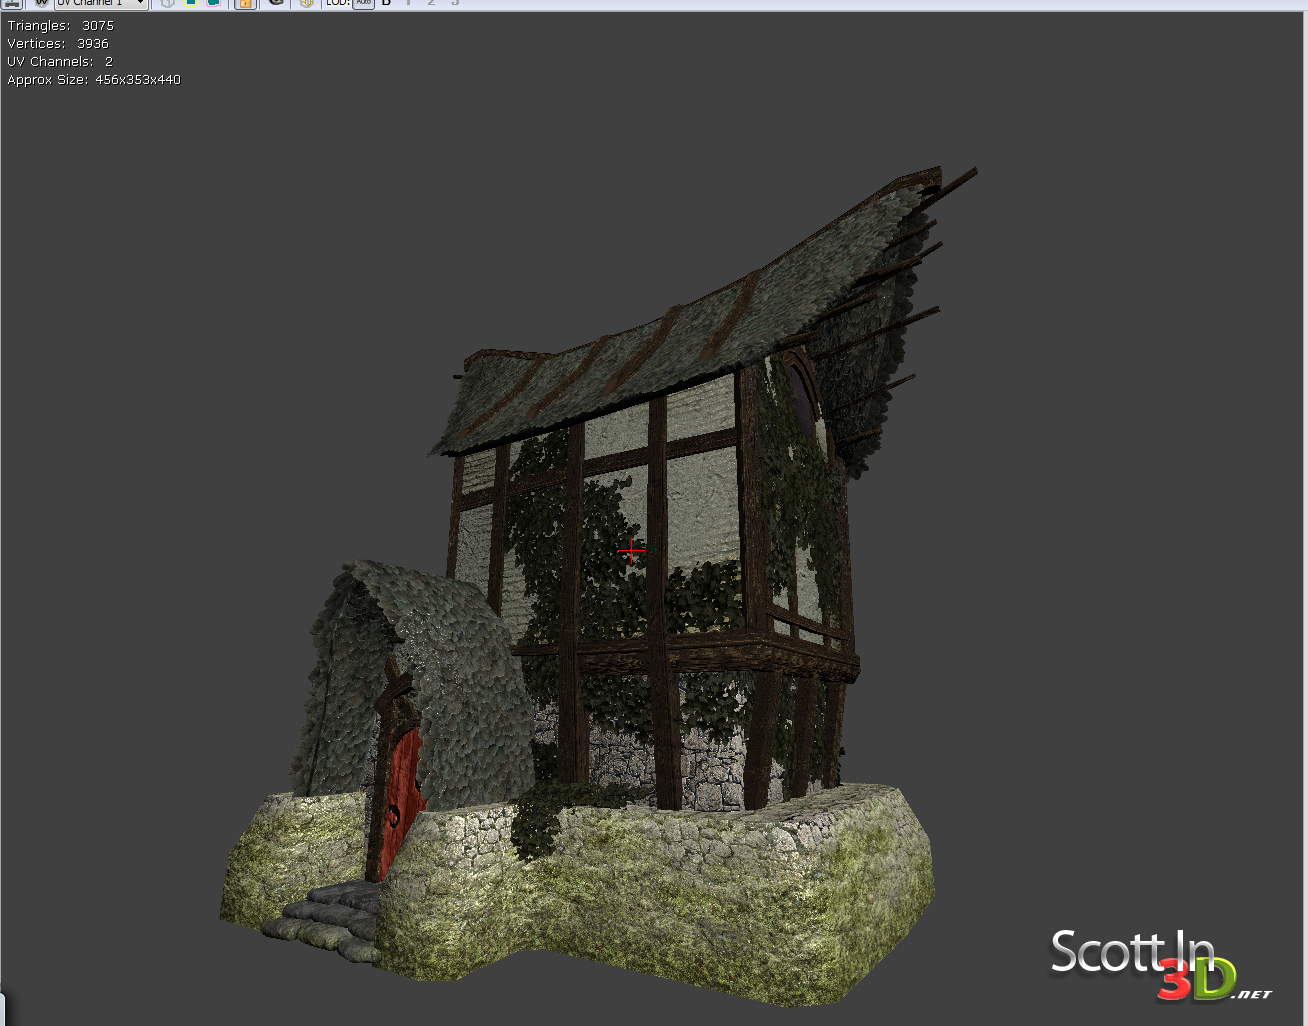
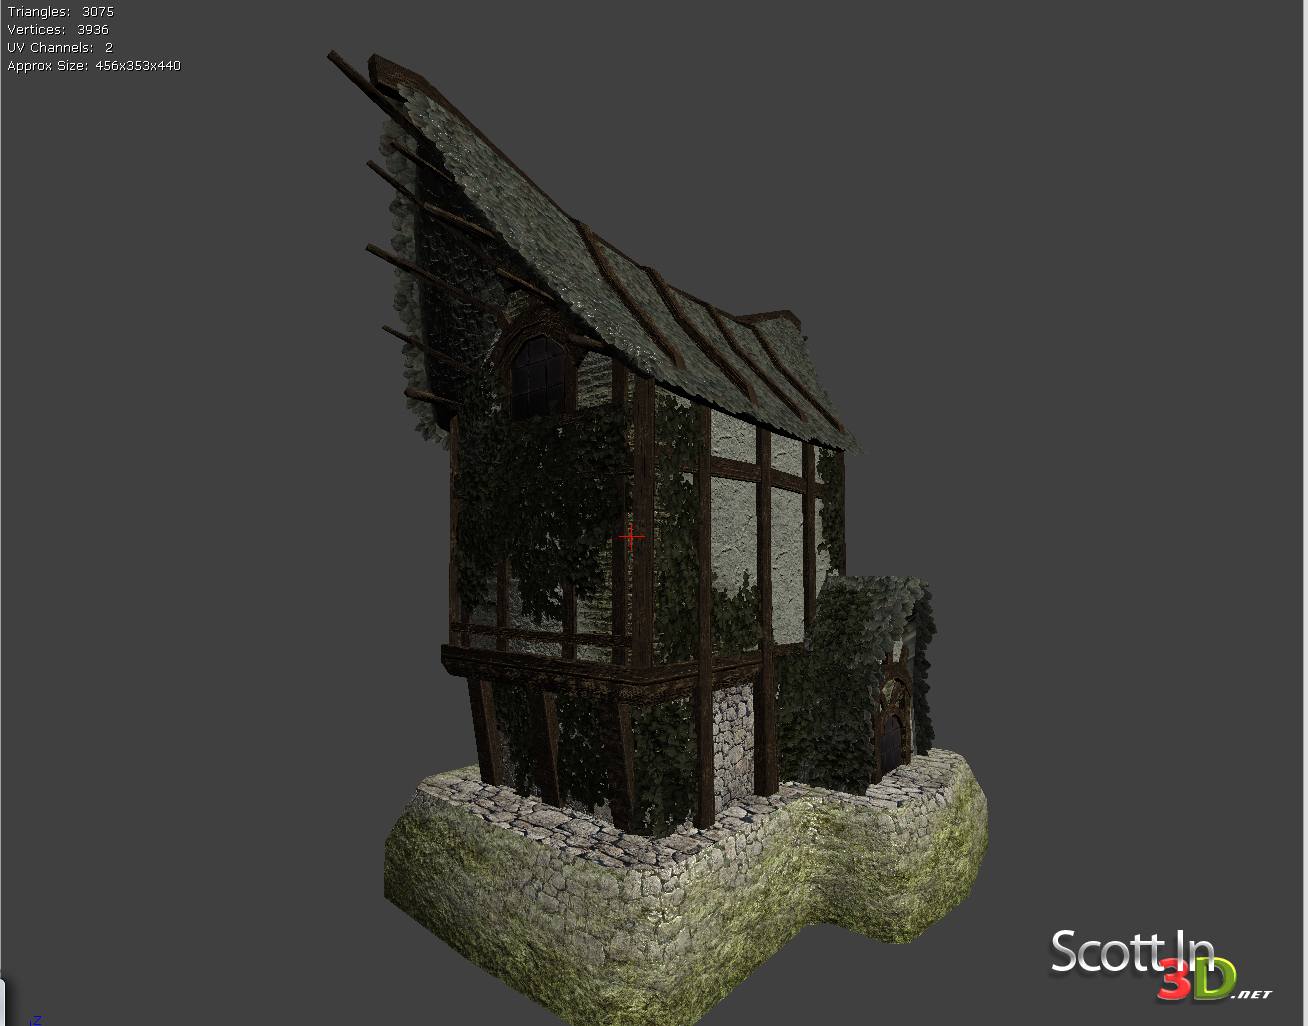
Attachment 2484
Modeled in about a 6 hours total. Slapped some random wood and metal textures. I'm looking for criticism on how it looks in comparison to this:
Attachment 2485
There are some personal differences, mainly with some proportions. I haven't really gotten into much with details, but is the basic shape good? What could use some work?