Just something basic right now, nothing special, hopefully the nudity is tasteful, if not ill be glad to take it down but anyways, mostly looking for crit on pose and the overall dimensions of him, if anything looks awkward feel free to let me know.
Printable View
Just something basic right now, nothing special, hopefully the nudity is tasteful, if not ill be glad to take it down but anyways, mostly looking for crit on pose and the overall dimensions of him, if anything looks awkward feel free to let me know.
Ear looks too far back, but I could just be crazy.
I think Bacon likes it how it is, but more peoples opinions couldn't hurt.
(Warning large image - 5mb)
http://derek.pepness.net/Modacon/modaconhuge.png
And for those interested, yes, there will be an announcement for this on Modacity. I only have the private invitation typed up, though.Quote:
Originally Posted by MrBig
C&C. Sorry about the very noticeable crisp edges at some parts. My comp can't handle rendering the whole thing in one go so I had to render it in 4 separate parts and shop them together. I wasn't going to render it until I finished the hull, but I spent the whole day backing up files and decided that my comp was going to multi-task.
The majority of the center area is done only a few more details to get done.
I'm still deciding whether or not to make the "mesh like fencing," I really don't know the actual term, actual tris or just texture it in.
So, all the mods are invited right :-3Quote:
Originally Posted by AdmiralBacon
Of course not. :-3Quote:
Originally Posted by Reaper Man
Oh wai-
Well this is him colored and shaded/highlighted. Comments and criticism graciously accepted. I'm really trying to get my poses perfect and lifelike. And ear fix coming soon bobby(no i haven't forgotten, and if you're squeamish to the slightest amount of nudity, do not click below.)
:O Baking worked... Well. It looks like shit because I did the cage shit because ti was just a quick test. But look, basic normals working :P
http://i58.photobucket.com/albums/g2...d_MAgnum_1.jpg
rofl nice... I remember when i got my first botched one working I was so happy.
I think you are doing the process with 3ds max with the cage and all? I don't want to stop you from doing that, because sometimes its better to know how to do it in various different ways, but xnormals already sets the cage and everything. Maybe you already know about it, but just saying. It helps alot. Imo of course. ;)
I will look into this xnormals thing because you have mentioned it afew times Lol.
Not sure what you are doing to make it look like that, but if you are using the default cage that it makes for you, don't.
Reset the cage and manually expand it out a very tiny bit - you want it as close as possible to the HP model without the cage intersecting any of it. Basically, expand it out a tiny bit so that it covers most of the HP and for the parts where it is intersecting, select the vertices for that part of the cage and manually expand them out.
Also, if you are using more than one smoothing group on the low poly model, give the entire gun a single smoothing group. If you have smoothing errors than fix them and try again.
If you haven't already watched it, that one AK47 tutorial that someone posted a while ago probably covers baking out decent normal maps - if not, check the thread where I linked you to a million things.
Make sure your low poly has all the same smoothing group when baking as well if your unwrap doesn't have a different island for each smoothing group change.
split your smoothing groups according to your UV's
(if there's a UV seam, make sure there's a smoothing-seam as well)
also, dont use Xnormal, or any other bullshitp program that lets you pull magic stuff out of your ass all you need are max and photoshop, and if you actually KNOW what you're doing, you can use crazybump as well. anything else is completely obsolete and only shittifies our workflow in general.
Workin on a pitch for a space shooter descent style game. Here's some quick concepts I threw together to show the good (first image) and the bad (second image) ships.
The other artist for our team said not to shade them, he was even iffy in wanting to add any color... but I think they look even more horribly unfinished without any color.
The second one's not really that great, but honestly it far surpasses the first one. The first is just a nondescript blob. Design it with a purpose in mind, and shape it accordingly.
Quote:
Originally Posted by IceCube
Its better to learn something authentically than to rely on an application, Xnormals is for lazy people who dont enjoy the self satisfaction of a good bake :P
yeQuote:
Originally Posted by Malloy
There is enough tutorials and videos out there on how to bake correctly.
Are you honestly ragging on an app that some people find easier to use? As long as the quality of the bakes are the same, what does it matter? It honestly sounds like you two (dee and malloy) have no idea what you're talking about, because it's not like you can do a "fake" bake. Using xNormal, maya, or any other kind of program (which can bake) is just as legitimate of a way to go about baking as using 3ds max.
If you guys learn to read, I said its good to learn to do it the hard way. Xnormals does the job faster and just as good. It hasnt failed me yet. There is nothing wrong with using xnormals. Its for people who know how to do it the other way, and dont need/care about spending time on something they dont have to.
Quote:
Originally Posted by IceCube
you should always care dude, also my previous post was relayed for Hunter not a personal attack on your own habits.
@ Hunter i'd highly recommend sticking to the authentic method as 1) its more satisfying getting a legit result 2) doing it the authentic way just gives you so much more experience n shit. becomes a second nature you probs understand.
how is it authentic? One way requires more steps and an application. The other method, requires less steps and an application. Care to explain how it helps make work more authentic? (just wondering, because it doesn't make any sense).
Malloy, you don't know what you're talking about. As for this conversation, it stops here. No use in fighting, no one's going to budge.
When using the word 'authentic' I was referring to the genuine 3dsmax method of baking. Also telling someone that they dont know what they're talking about doesnt make it true, only incinuates that you are a bias contributor to the discussion at hand. This will be my last post on the matter unless provoked, was just trying to sway Hunter into learning the 'genuine' way effectively before using Xnormals.
get over it "k thx bai". So to speak.
oh god, the irony in this post, i love it.Quote:
Originally Posted by Malloy
E: as for you, malloy, when a section mod tells you to discontinue, you do it. Next time will result in an infraction. Next post better assuage me.
Think I will learn the hard way then. I did not realise that xnormals was a application which does it automatically for you. I do not really like programs like that.
I prefer manually making things, better results and more control.
Not done yet(missing handguard), and the origin is waaay horrible/temporary, but I think I've figured out a fairly easy method of building models of Pimp My Gun creations.
Also just realized that I fucked up smoothing on something again. :suicide:
i actually kind of like it, gj!
welp I think its ugly really.
Pretty boring.
But its got no textures so :/
Maybe in time.
http://i58.photobucket.com/albums/g2...dst_pistol.jpg
Does that clip more interesting and better than normal flat one, and is it worth the extra polys? The "bullets" are cylinders with open ends and have 4 sides.
This raises the pistol up to 2584 triangles. Doesn't really make sense how the thing that pushes the ammo up is at the top though and there is still ammo into the clip Lol.
Looks better, although you may want to have a bullet at the top for the final model.
Maybe replace the bottom of the mag with a magazine extension so it looks a bit more interesting? The basic magazine bottom design that Bungie uses looks terribly boring :<.
For the lolz
http://www.youtube.com/watch?v=W226xCIcLG4&fmt=18
That made me laugh!~ :neckbeard:Quote:
Originally Posted by Advancebo
@Hunter: you can just texture and norm-map the bullets on. The odds of it being seem is very low, even if reloading. It's really not worth it, but the top half of a bullet on the top of the mag is always a good idea.
That is a stupid idea because of the amount of depth that it should actually have, don't you think I have thought of texturing the bullets in already? If the details didnt have as much depth then I would. But texturing that in would just look stupid.
Bullets could easily only be a small section of cylinder, not the whole thing, the only bullet that would need the most faces is the one on top, the others only need enough faces as to what will be seen, also you only need at most about 3 or 4 sides for each bullet, and for the hole in the mag, you could easily do with an alpha map. Putting to much detail into that is just wasting resources which could be applied somewhere else that would be more aesthetically pleasing, especially because these details will only be seen in a brief sequence.
I agree with you on the hole in the clip, but the only thing I hate with doing that is that the hole would make the clip material look paper thin if you see it for a while.
I could add some different details instead which may make it look more interesting.
depending on how extended the clip is from the bottom of the gun and the fp gun placement, the paper thing wouldn't really matter since you'll only see it during reload which is less than 3 second at most if the mag isn't extruding from the bottom or isn't seem.
It's a very low visible area. maybe adding details where they're more visible.
Im probably going to be making a UT3 map, so I decided just to touch up on the rock modeling. It isn't very good in my opinion, but that's me.
http://i148.photobucket.com/albums/s...NGINSULFAR.jpg
http://i148.photobucket.com/albums/s...IDNTONIGHT.jpg
I learned vertex blending too :iamafag:
I am fussy with things like that Lol. if I see paper thin metal because alpha maps then I don't like it. Like I said, I am going to try something else.Quote:
Originally Posted by kid908
Also, I made a lamp-post :/
http://i58.photobucket.com/albums/g2...lamppost_1.jpg
Cute, but I personally think it's a bit overdone. Either way nice concept just the lights look a bit pointy.
pretty neat.
Well, I think I've got the model done-ish(still trying to fix a few smoothing errors and such). Now to figure out if I suck at skinning or not. =/
:lolugh: either lose the bullets in the mag or lose the magazine follower on the top and add a modeled bullet there.Quote:
Originally Posted by Hunter
SPACE RAYZ
Im guessing its based off the ones in Halo 3's The Storm?Quote:
Originally Posted by Hunter
Yup ^
And I will lose the bullets Snaf.
Click for lolhuge...
Working on a vector of Scooby-Doo. This is my first time using illustrator and I'm doing this to help me get familiar with the pen tool and all it's functions. I Will be adding color in soon, btw. Was just wondering on what parts of the outline I should fix, if at all. I think now that looking at it some more, the right side ear could use some fixing up, as well as the eyes.
Maybe it will look better when you color it in, but I think it would be best to use the offset tool to make your strokes rather than basic line stroke. That way you can round the edges and have better control of the stroke.
http://img228.imageshack.us/img228/2...colorsmall.png
Huge Version...
Well, almost done. Just a few more tweaks here and there from what I can see. Would love if someone could point out any errors or pass along some tips. Speaking of which; MrBig, I tried using the offset tool but I couldn't get the results I wanted with it. Of course though, I'll have to play around with it more to get a feel for it and learn how to properly use it (which is pretty straightforward, just not in a "learning mood" atm). Nonetheless, thanks for the tip. I think it's turning out good though, just the way it is.
The bottom of the image where his neck is just looks weird how his neck gets smaller. Makes it look like the rest of him would just be a worm body.
http://i298.photobucket.com/albums/m...mv2/sheet1.jpg
WIP character sheet... not sure if I'm going to shade it or not, some input would be good (sorry about the outlines Snaf, force of habit)
Shade it.
Working on a custom hunter design.
This one which once done will be designed along the lines of using upgraded covenant technology [hunter has shields in more ways than one]
I've added the hunter to the scene to show the proportions which seem to be all in shape.
Any C&C on the design or other aspects would be greatly appreciated.
http://img134.imageshack.us/img134/6749/rendera.pnghttp://img232.imageshack.us/img232/8...2aug142352.jpghttp://img199.imageshack.us/img199/1...1aug142352.jpg
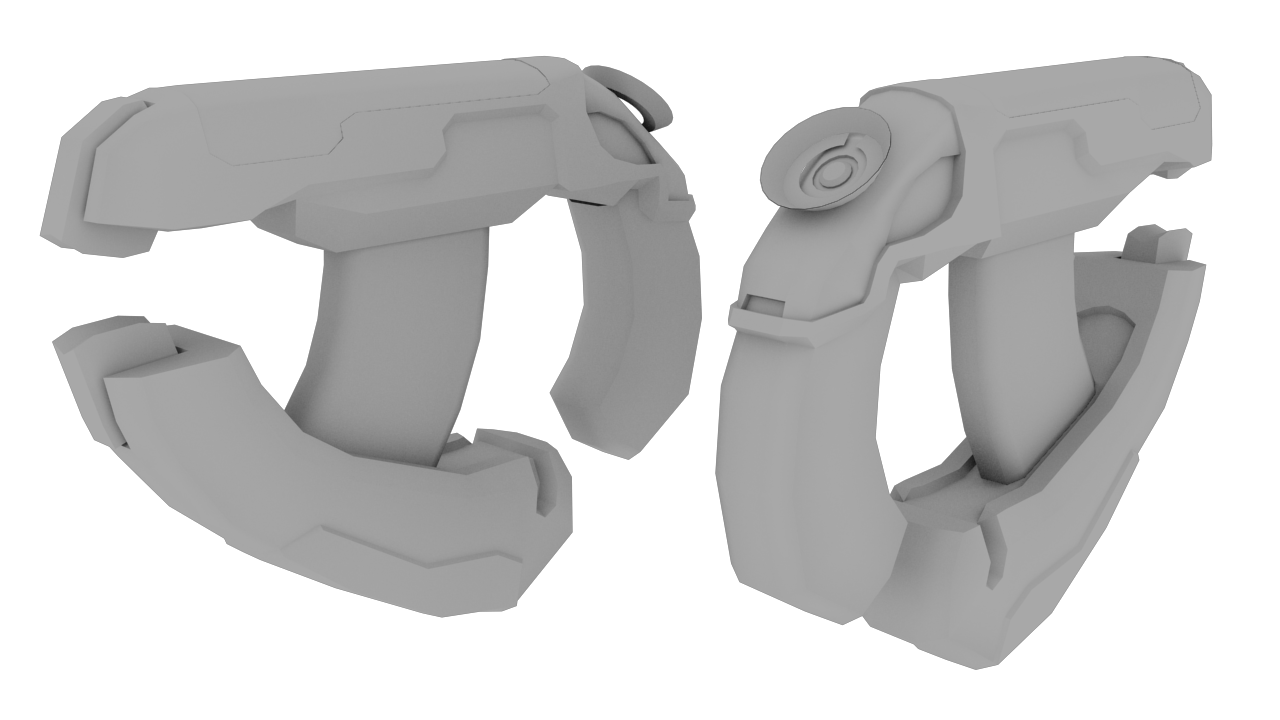
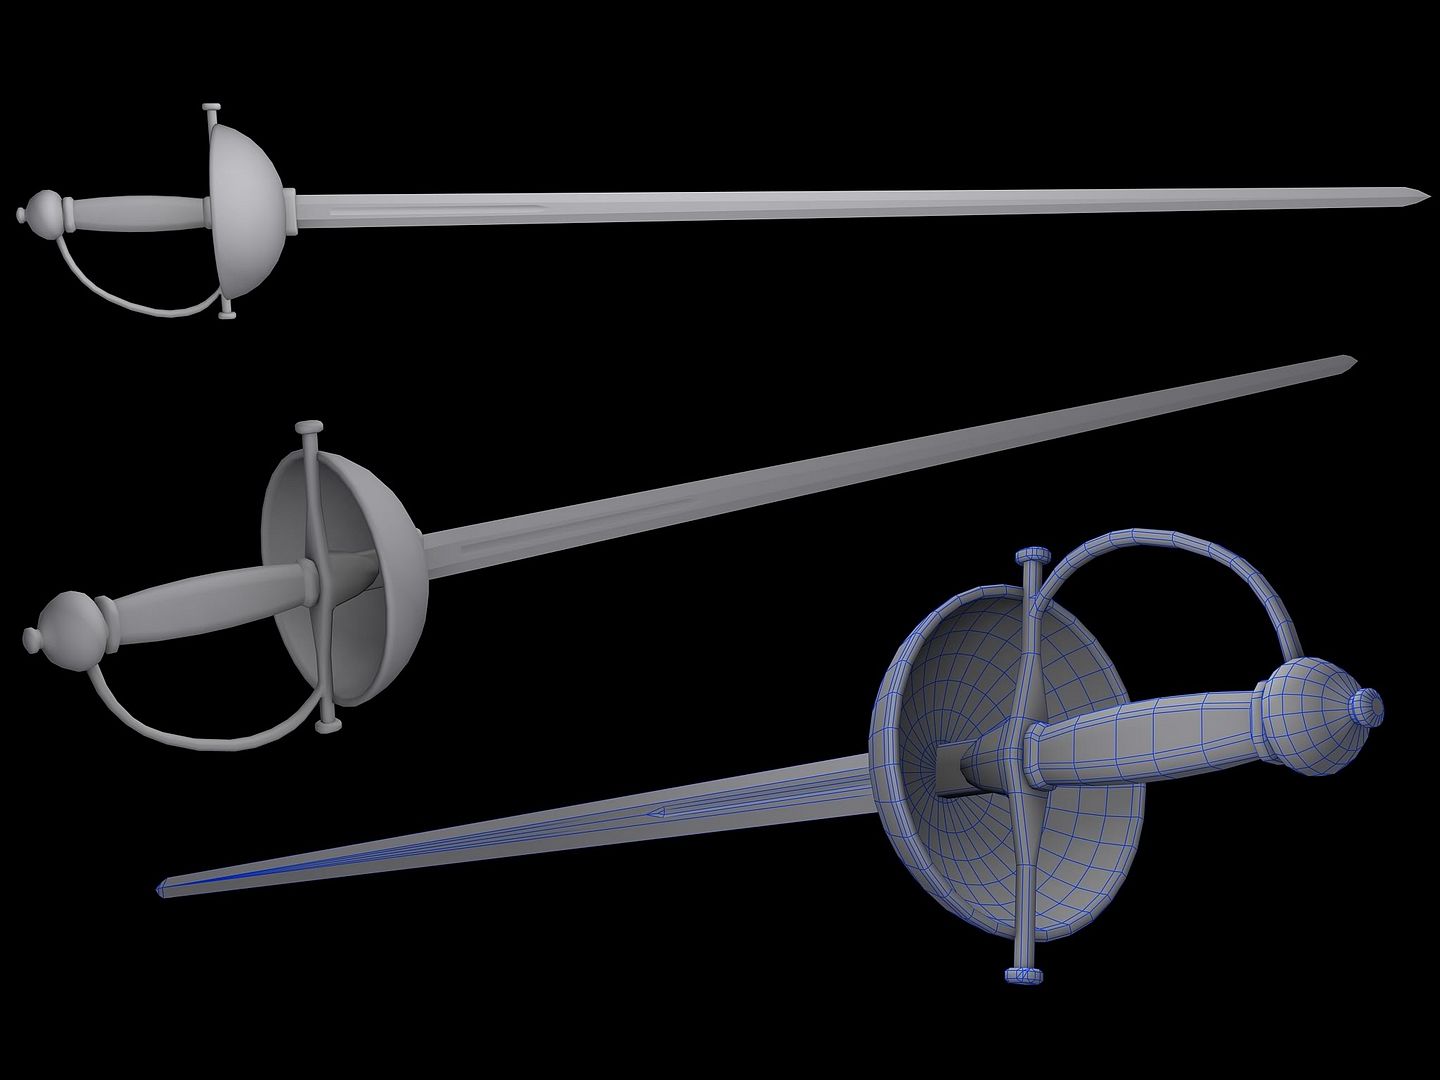
2652 triangles. same deal as last time. its for a game, and im looking for crit on my mesh, smoothing, and poly distribution
it looks good, but when you put it in the game, you could reduce the amount of polys on the grib area, since there is going to be a hand there
i plan to have the whole weapon used in the first person animations, so unless youre talking explicitly about the part where the hand will be, youre going to see everything in the anims, including that bottom bulb part
2.6k tris is fine for a first person model. In fact, it's good for a third person model in some cases. I wouldn't worry about reducing the tris, personally.
spheres are useless in games, the amount of polys for the effect is just silly.
Grab a box, smooth it two/three times. You'll get the same effect.... tons easier to UV too.
New set of screenshot textures, v2. v1 can be downloaded here: http://hce.halomaps.org/index.cfm?fid=4129
http://i218.photobucket.com/albums/c...3textures1.jpg
http://i218.photobucket.com/albums/c...3textures2.jpg
http://i218.photobucket.com/albums/c...3textures3.jpg
http://i218.photobucket.com/albums/c...3textures4.jpg
Originals by Bungie from Halo 3
Screenshotted and Edited by Advancebo
Unlike the old ones, I took time on these to make them the best I can.
More will be shown, then after I make about 5-7, Ill release the v2 pack.
Remove the green colour cast unless it's meant to be like that, which I doubt
the thing is that the hemisphere is perfectly symmetrical and achieves the rounded belguard effect i was going for. normally i would do what you suggested, or use a geosphere, but in this case i figured the quads would make the smoothing, mesh, and general appearance better.Quote:
Originally Posted by Llama Juice
also as far as UV mapping is concerned, i could unwrap this myself. and im horrible with uvws. i would just select the whole top and flatten it out on the UV template.
Or play it off and say its "white noise" from the Venture Bros.Quote:
Originally Posted by rossmum
Wha?Quote:
Originally Posted by Con
Almost done, just a few more tweaks. I fixed the neck a bit 9thnx for the tip LlammaJuice) and added the collar which makes him looks less slender. Note that the background was just for contrast and may not be in final image, but it does sort of fit with the Scooby-Doo time era.
:iamafag: I like the background.
Fix the dog tag a bit so it's not so flat, and I guess it's done.
http://en.wikipedia.org/wiki/Colour_castQuote:
Originally Posted by Advancebo
The floor looks too green. You can remove this using curves.
I feel like I'm always learning somehting on this website. :ohdear:Quote:
Originally Posted by Con
Done a few more
http://i218.photobucket.com/albums/c...3textures5.jpg
http://img12.imageshack.us/img12/1108/niggerded.png
First attempt at this kind of thing. Once DEE stops play gmod he can help me fix it up.
Vectors done in photoshop and then exported to 3ds max.
e:
http://img34.imageshack.us/img34/861/wongdongs.png
What is it? Simon says?
Made custom signs:
Arrow was vectored by MrBig/AVPdragon
http://i218.photobucket.com/albums/c...3textures6.jpg
I honestly have to ask, why do you make screenshot textures instead of remakes from scratch or something?
Easier?Quote:
Originally Posted by flyinrooster
Because I cant texture for shiz.
Seriously though Advancebo, fuck all of these screen capped textures of from this thread... because why would you need crit for bungies work? Apart from the Hue and Saturation levels and stuff...
You show concentrate on learning to texture instead of spending your time take pictures... it is just pointless and stupid. If you want to waste your time then find, just don't post them here.
I am not dissing you by the way, I am just telling you what is what. The screen caps look decent but your time could be spent elsewere.
Also, some of your offsets are horrible. 50% of the tiled textures have bad seams. Nice try though.
http://img9.imageshack.us/img9/8017/rockurdock.jpg
Model by DEE. I'm painting it in Mudbox, first time doing something like that.
Desaturated for now, but Mudbox can do some really amazing stuff with textures.
Just a random rock.
It's 4 am and I'm finally going to bed.
By editing screenshot/textures, I am at the same time learning to make textures. And using techniques from editing to create new textures.Quote:
Originally Posted by Hunter
No, you really aren't.Quote:
Originally Posted by Advancebo
Suck it up and go learn to make textures. There are tutorials on getting started everywhere on the internet. Spend two seconds on google and you will find them. Check the studio resources thread as well. That has some stuff too.
I did learn, and it didnt come out great. Im sticking with modeling mostly, not really efforted to learn to texture.
Then you didn't try hard enough. Stop making excuses, and don't bother showing work that isn't yours. Editing a screenshot to fit a basic UV doesn't count as being your own work.Quote:
Originally Posted by Advancebo
Shaders v2
http://screenshot.xfire.com/screensh...130e5c6487.png
http://screenshot.xfire.com/screensh...282adbc90d.png
http://screenshot.xfire.com/screensh...fdbdae49cb.png
Cons? Pros?
I think I should tone down the shininess.
I redid the main bitmap (default mark vi) and made the rubber darker and changed the multi abit.
As you said, I would make the shader a little less shiny, but I would also tone down the black lines (for example, the knee cap) just a tad; for me, it is too much contrast. Its getting there, though.
I learned to do basic texturing/skinning by repeatedly fucking up about 8 times until something came out decent and telling myself "that's not good, I have to do better". And, other than from tips fron Dane and Con, I really didn't watch or read any tutorials to learn.Quote:
Originally Posted by Advancebo
lol, you probably might know that I did turn down the black lines alot from my previous v1 shaders. Well time for some adobe photoshopping! Thanks.Quote:
Originally Posted by MetKiller Joe
No offence, but that looks like a huge turd.Quote:
Originally Posted by MrBig
Looks like cheap plastic, or a badly painted action figure. Keep in mind this is a soldier's armour. It should be very dull, no one wants to be shiny in a gunfight :SQuote:
Originally Posted by Spartan094
That's what I told DEE.Quote:
Originally Posted by Newbkilla
Why isn't the normal map on it? :/
http://img15.imageshack.us/img15/2258/12839272.png
That doesn't look like any rock I've ever seen. What sort of rock erodes a uniformly deep trench all over through an otherwise smooth polished, roughly spherical surface?
I've seen plenty of stones look simular some even have holes eroded on them leaving them in a o shape.Quote:
Originally Posted by Rob Oplawar
I dont really have contact with them :\Quote:
Originally Posted by FRain
Then fine someone else, Con and Dane aren't the only two texture artists in the community. (Well, what ever happened to Dane, actually?)Quote:
Originally Posted by Advancebo
deathstarQuote:
Originally Posted by Rob Oplawar
Dane is permabanned. And I agree with rob. Your rock makes no sense.Quote:
Originally Posted by ODX
Made for Operation Black Mesa.
Looks nice, though I thought the Black Mesa project was dead..?
What?
For this?Quote:
Originally Posted by NuggetWarmer
http://www.blackmesasource.com/
I thought they stopped working on that a while ago.